Manual Content
The Filterable Grid for Divi module by default mimics the style of the Filterable Portfolio module. It uses the same style for the filter buttons and a 4-2-1 column layout for desktop/tablet/mobile. However, unlike the Filterable Portfolio, it’s easy to change the style. You can for example choose how many columns you want to display for each device class. Here we use a 3-3-1 layout with manually created content.
Generated Content
The grid above uses manually created items but of course you can generate the grid content from your projects as well – and not only that! You can use any post type with a hierarchical taxonomy. It also works for additional taxonomies on existing post types. You can even mix post types – for example projects and blog posts – and manually added content.
When generating content, you have additional options. You can for example display the excerpt or content of the post, hide the title and the terms and even display a button with a custom text. Of course you can also use a overlay color and icon for the image.


Image and Video Galleries
Filterable Grid for Divi can also be used to create filterable image and video galleries.


Custom Style
However, the real power of Filterable Grid for Divi are the endless custom styling options. Every single element can be styled to your liking, right out of the module. Writing custom CSS is almost never necessary – even if there are CSS fields for each element in the advanced settings.
If you ever find yourself in a situation where you can’t style with switches, sliders and pickers and the advanced CSS fields are not enough or to complicated for you to use, let us know so and we are happy to improve our module and add new settings!
By the way, most of the styling options can not only be configured module wide but you can overwrite them in every single item. You can go really crazy when styling Filterable Grid for Divi and achieve incredible designs with it. If you ever get stuck, we are always here to help you build your awesome next project!
Sunrise 1

Sunrise at the Sea 1
A nice sunrise at the sea.
Sunset 1

Sunset at the Sea
A nice sunset at the sea. Take a break and enjoy the landscape. You deserve it. Have a great day.
Sunrise 2

Sunrise at the Sea 2
A nice sunrise at the sea.
Japan

Sunset over Mount Fuji
Japan is amazing. You should check it out.
Sea 1

The Sea
The sea is rough.
Sea 2

The Sea 2
The sea is calm.
Item Animations and Default Filter
You can even change the Grid Item Animation or set a default filter if you desire. The later is especially interesting in combination with hiding the “All” filter and the manual order of filters (by default they are sorted alphabetically but you can sort them however you like). Here are a few examples but there are a lot more animations available.

Item 1
This is item 1

Item 2
This is item 2

Item 3
This is item 3

Item 4
This is item 4
Item 5
This is item 5

Item 6
This is item 6
Material Columns
Filterable Grid for Divi works really well together with Material Columns for Divi. If you haven’t got them, you might want to check them out or buy them on Elegant Marketplace.
Support & Feature Suggestions
Documentation / FAQ
Here you find answers and solutions to the most common problems.
My grid looks strange after an update
When an update introduces changes to the underlaying CSS, default settings or the HTML structure of the module, at first the module can look messed up on your site. The fix though is really easy. Simply clear your sites CSS cache. By default, Divi uses static CSS generation. You can clear the cache in the Divi settings in the Builder tab.
How to display the title inside the image container
How to sort grid items
How to generate grid items from posts
How to add items manually
How to use custom filters and filter order
If you ever have the need to apply a custom ordering to your filters or if you want to use completely custom filters even for generated items, you can do so by deactivating the Generate Filters setting. Have a look at the tutorial video or the written step-by-step guide below.
Step 1: Prepare your Taxonomies and Posts. In this demo we will use blog posts and categories. As you see, the category “Category 1” has a custom slug of “cat-1”. Be aware that Filterable Grid for Divi uses the Name field of the terms, not the Slug field for filtering. If you have multiple terms called “Category 1”, e. g. one inside Posts and one inside Projects, they will all match a possible “Category 1” filter. If you mix Posts and Projects, there will only be one Category 1 filter.


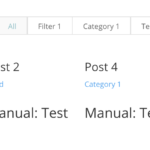
Step 2: Add Grid Items. The next step is to add your grid items. As you can see below, even generated Grid Items can make use of the Filter field. The filter will be added to the generated filters of each item. If you for example choose to generate items from Posts with the category “Category 1” and add “Filter 1, Test” to the Filter field, the final result will be that the generated grid entries can get filtered by “Filter 1”, “Test” and “Category 1”.
Here we set up two generated Grid Items, one for the “Category 1” posts and one for the “Food” posts. We also add custom filters to each Grid Item. Notice that we don’t need to add a filter to the “Category 1” because it will get this filter automatically. Finally add two Manual Grid Items.


Step 3: Create the Filters. Now the last step is to create the list of filters. If the filters were generated, Filterable Grid for Divi would automatically create a alphabetically sorted list from all the different filters. In that case, the Filter List would be “Category 1”, “Filter 1”, “Food” and “Test”, in that order. Since we want our own sorting and also omit the “Food” filter, we deactivate the Generate Filters setting. Then we simply add the list of filters in the order we would like it to appear. If you are using generated items, use the name of the term as the filter (in the example below “Category 1”).

Result: The final result is a grid which has all the items you configured with only the filters and the order you added in the Filters field:


How to add a module to your page
To add custom Divi modules to your page, you currently must use the backend builder. Due to limited support from Elegant Themes, third party modules do not work in the visual builder. Elegant Themes announced better third party support for Divi 3.1 but has not announced a release date yet. Once available, we will update our modules as soon as possible.
How to update your plugin or theme
Updates for our products get delivered automatically right to your WordPress backend. Either go to Dashboard->Updates or use the update button in the Plugins or Themes section.
Attention: Some of our products require an activated license to get updates.
How to activate your license
If the modules requires a license key, go to the Plugins section of your WordPress backend and select the submenu for the module. Enter the license key in the license key field and click the save button. An activate button will appear. Click it and if the license is valid, you will see a green activation confirmation.
If you don’t see a green activation confirmation, the activation failed due to an invalid license. Make sure you enter the correct license and click the save button before clicking the activate button.
Not all of our module require you to enter your license key to work. If there is no settings page to enter the license (as described above) then you can use the module as is without entering the license key. However, this is subject to change in the future, so keep your license in a safe place.
How to install a Divi Module
Our Divi Modules are WordPress plugins and can be installed like any other WordPress plugin:
- Download the zip file from Elegant Marketplace
- Head over to your WordPress backend and go to the Plugins section
- Click “Add new”
- Click “Upload Plugin”
- Select the zip file you downloaded earlier
- Click “Install Now”
After the plugin is installed, make sure to activate it.
Where to find your license
If your module requires a license key and you did not receive one via e-mail from Elegant Marketplace, you can do the following:
Head over to Elegant Marketplace and log into your account. Then go to your purchase history:

Find the “View License” button:

Click on the little Key icon to reveal the license key:

If there is no license key available for your purchase or if the license key expired unexpectedly early, please contact the Elegant Marketplace support. Licenses are generated by Elegant Marketplace and generation and renewal are out of our scope.
Link to grid with specific filter selected
You can open a page with a Filterable Grid and select a filter by default. This technique is often used to link for example a image on your landing page to another page containing a Filterable Grid. Depending on which image on the landing page was selected, another filter is selected in the grid. Fortunately this is quiet simple to achieve and it involves only 3 steps.
Step 1: First, head over to the Filterable Grid module, switch to the Advanced tab and give the module a custom CSS ID.

Step 2: In the second step, go to the page, open the inspector of your browser and inspect the filter you want to select by default. Note the value of “data-category-slug“.

Step 3: With the ID and the slug of the filter, you can finally build the url. To the url of the page where you have your grid, add a trailing slash (“/”) followed by hashtag (“#”) followed by the ID of your module followed by a pipe (“|”) followed by the slug of the filter. If you now visit this url, the filter will be selected by default.

Important Note: This functionality is defined and developed in the Divi core and we are not able to customize this behaviour. If you need more specific functinoality like scrolling to the module if it is at the bottom of your page, we can develop a customized JavaScript code for you (for a little fee).